Monday, May 7, 2012

Red Robin's Freckled Lemonade

I'm a huge HUGE fan of trying out new drinks, and I recently read that, apparently, Red Robin has an AWESOME drink called Freckled Lemonade. It consists of your normal lemonade filled with crushed strawberries. The crazy thing is though, this drink is so famous that the diners go through about 420,000 GALLONS of it every year AND Food Network (FN) states that the drink is "so famous that [Red Robin] actually has a cocktail, a shake, cupcakes, and even a pie inspired by it". Red Robin, of course, won't give up the recipe, so what FN did was, create a replica of it in their own test kitchen!

Here's the recipe by FN called "Almost Famous Strawberry Lemonade" ---


What you will need: [makes 6 servings]

Zest of 1 lemon, in wide strips
2 cups sugar
2 cups chopped hulled strawberries
2 cups fresh lemon juice (from about 10 large lemons)
1/4 teaspoon salt

Directions:

Make the lemon syrup: Bring the lemon zest, 1 1/2 cups sugar and 1 1/2 cups water to a boil in a medium saucepan, stirring, until the sugar dissolves; let cool to room temperature.

Meanwhile, make the strawberry syrup: Toss the strawberries and the remaining 1/2 cup sugar in a bowl and let sit at room temperature until the sugar dissolves, about 45 minutes. Strain the strawberry mixture; reserve the strawberry syrup and berries separately.

Make the lemonade: Combine the lemon juice, lemon syrup, salt and 2 cups cold water in a pitcher. For each drink, put about 1 tablespoon of the strawberry syrup in a tall glass. Fill with ice, then top with the lemonade and some of the reserved strawberries.

How amazingly perfect does this drink sound? ... It sounds WAY amazingly perfect because it pretty much is! I tried it out the other day when I had a few friends over and it was a HUGE hit! Some of us added the strawberries on top, and others didn't, but in either case, the strawberry syrup adds the perfect fruity flavor! Yum, yum, yum! ... My only criticism about this recipe is that it probably doesn't even need the salt, so next time, I won't be putting that in. But what I know is: with the summer here, this is going to probably be one of my favorite drinks for sure! Let me know if you try it out too!

The picture and recipe featured in this blog post were taken from foodnetwork.com.

Thursday, May 3, 2012

Book Signing with Giada de Laurentiis

This weekend I had one of the most AMAZING experiences as I got to meet, by far, my favorite chef and writer who everyone knows from The Food Network: Giada de Laurentiis! This amazing chef, recently wrote a new book, "Weekends with Giada" and was on tour doing book signings all over the country! I am a fan of her Facebook page (https://www.facebook.com/giada?ref=ts) and had originally seen a post about how she was doing a singing in Washington, when I thought, "HMMM! I should check if she is coming to Arizona as well," and sure enough, one of her destinations for the month of April was one in AZ!!! (http://www.giadadelaurentiis.com/) I proceeded to ask my mom if she would like to attend this book signing with me, and she agreed, so we both went, and let me tell you, I am SO glad that I didn't hesitate in making my decision to go because it was an event that I will remember forever!

The book signing was held at Sur de Table (http://www.surlatable.com/) in Scottsdale, AZ at 11:30am on April 29, 2012. It was divided into two parts, a Q&A session and then the actual book signing. So first, a little bit about the Q&A session. When Giada first walked to the area where the Q&A session was being held, everyone started cheering and rose from their seats to give her a warm welcome! The first statement she made was how she was very excited to be in AZ, in the sunshine, especially after being in the rainy weather of CA. She then stated how listening to her talk would get boring for all of us and immediately opened up the floor to others to ask questions to get to know a little bit more about her. There were SO MANY people who had attended and in my opinion, everyone asked Giada some very interesting questions! These questions ranged from things about what her favorite cookware was, to questions about her daughter, all the way to questions about the upcoming season of The Next Food Network Star. I'll just go through a few of the questions that I remember in great detail and explicate Giada's answers to each, and of course, as can been seen throughout the post, I've added some pictures from this portion of the event!


One of the first people to speak I remember was, a man. He told Giada that he was 23 years old and was done with college but was not sure what he was going to do now. He continued on to ask her how she had decided that she wanted to be a chef and asked what advice she had for him for the future. Her response was very heart-felt because she went on to describe the structure of her family and stated how, because she was an Italian female, there was not a whole lot of restraint that was put on her in terms of what she could do in the future. She was not very intimidated, but her family was worried at the time of her original decision because she is a very petite woman who was going to go into an industry that was dominated by big, strong men. She said she followed her heart and it has brought her to where she is now because of it! Well, good thing she had the confidence to do what she did because she has now become an inspiration to many aspiring chefs!


And so, speaking of aspiring chefs, there was a woman who attended that day for her 18 year old granddaughter. She had a chance to speak with Giada and had brought a letter from her granddaughter whose biggest inspiration is Giada. She told a VERY heart warming story and at the time, Giada was at a loss of words and very touched by the moment. She proceeded to approach the woman, sign her book, on the spot, and gave the woman a hug prior to continuing the Q&A session.


Another question that someone asked was with regards to Giada's daughter, Jade. That woman asked Giada, "what advice do you plan on giving your daughter as she is growing up and what kind of life lessons will you teach her?" Giada had to think about this for a moment and responded, "Well, thank goodness Jade is only 3 because this is a deep question!" --- Her response, in general, was that she plans on telling Jade to not limit herself in anything and to go forth with her dreams. She stated how, it is the case that most men already have built-in confidence and know what they are capable of, but in many cases (too many cases), women limit themselves due to a lack of confidence. So, with a daily reminder, she hopes to instill and enforce the confidence for the future, for Jade.

In addition to this, there were many more questions and the whole Q&A session lasted for about 45 minutes. I thought that Giada talked very passionately about her daughter and her family as well as her work. I'm so glad that now, I feel like I "know" a little bit more about a tv personality that I am quite fond of watching. It's easy to watch a tv show and formulate ideas about how you think a person is, but it's nice to know get a conformation on how that person is in real-life!

And finally, I have to add one more picture to this section because it was probably my favorite of the morning. There was a little girl who ran by, just in front of the stage that Giada was seated at, and waved. Giada looked at her and smiled ... it was a very sweet moment!


Okay so now on to the book singing part of the post! Below is my copy of "Weeknights with Giada" so you all know what it looks like:


The actual book signing was sadly very quick and the line was completely hectic so I didn't get a chance to say a whole lot to Giada as I was getting my book signed. I told her that I was very excited to meet her and thanked her for taking the time to come visit Arizona! Unfortunately, Giada was not posing for pictures during the signing, so I just snagged a picture of her signing my book! :o) 


And here, ladies and gentlemen, is how it looks:


Can you say, SO SO SO EXCITED?! Yes, indeed,I am!

In conclusion, I just want to add that this is such a unique book because it is filled with wonderful recipes including those for appetizers (soups and salads as well as bruschettas), lunch (sandwiches & pizzas), dinner (pastas & grains along with meat, poultry, & fish), desserts, and a few added extras such as breakfast for dinner! If you haven't gotten your copy yet, I would definitely recommend that you do so because it is a GREAT buy! I already have bookmarked many recipes that I'm planning to try out!!

AND because I'm a big fan of my fans, you all, I'm going to include a simple recipe from the book that instantly caught my eye when I was flipping through it. Let me know if you try it out and how it goes!!!

The above pictures and thoughts are my own. All that is included below this was taken directly from the book and is not my personal writing.

CHOCOLATE-HAZELNUT DROP COOKIES

Similar to my family's Italian wedding cookies (which are a lot like the Mexican kind), these drop cookies get their flavor from the smooth velvety combination of melted chocolate and hazelnuts -- also known as gianduja.  This is the stuff that makes my mouth water and brings me back to my childhood. Just as with chocolate chip cookies, some people like theirs soft and other people like them crispy. For softer cookies, bake them for ten minutes; for firmer ones, give them a full twelve minutes in the oven.

Makes 36 cookies.

What you'll need:

16 tablespoons (2 sticks) butter, at room temperature
1 1/4 cups confectioners' sugar
1 teaspoon pure vanilla extract
2 cups all-purpose flour
1/2 cup chocolate-hazelnut spread such as Nutella, at room temperature

Directions:

Place an oven rack in the center of the oven. Preheat the oven to 350 degrees F. Line three baking sheets with parchment.

In an electric mixer fitted with the paddle attachment, beat the butter and 1/4 cup of sugar on high speed until light and fluffy, 2-3 minutes. Beat in the vanilla. With the machine running on low speed, gradually add the flour and mix just until incorporated. Beat in the chocolate-hazelnut spread.

Roll the dough into 36 (1 1/2 inch) balls and place 12 balls on each baking sheet. Bake for 10 to 12 minutes, until the bottoms of the cookies flatten out slightly. Cool for 5 minutes and transfer to a wire rack to cool completely for about 30 minutes.

Put the remaining 1 cup sugar in a medium bowl. In batches, roll the cookies in the sugar until coated. Store in an airtight container at room temperature.

Tuesday, May 1, 2012

Pita Jungle

From about the first week that we moved to Arizona, I heard so much about one particular restaurant: Pita Jungle, that my mom and I had had to try it out as soon as possible! When we lived in South Dakota, we hadn't ever tried a Mediterranean restaurant, and quite frankly, I can't even recall if one exited there ... =/ Anyways, ever since I had my first bite of hummus and pita (more about that soon), this restaurant has been one off my favorites!

So, first, a little bit about Pita Jungle! This Mediterranean restaurant opened its first location in Tempe, AZ in 1994 and continues to feature a menu that promises a healthy variety of food made from the freshest ingredients. Thus, this menu encompasses salads, pitas, healthy burgers, wood-fired pizza's, and more! Currently, there are locations in both the state of Arizona as well as in California, but the growing popularity of this restaurant will hopefully mean that it will continue to expand across the country! 


So, let me now tell you a little bit more about their food. In this review, I have decided to feature three of my favorite dishes from the restaurant!

Dish number one: their cilantro jalapeno hummus, as seen below! This dish is on their "Starters" menu and comes with an option of two sizes: the small and the large. What is shown below is a small plate, which, as you can see, is fairly large! ... especially as an appetizer, which is why we order it with the meal. It is served with one pita and, of course, you can choose to order more pitas, as desired. I absolutely LOVE this hummus. It is by far my favorite hummus from here AND basically anywhere. I haven't yet found a good recipe to go use to replicate it, but it is definitely a treat. You can taste the mild hint of cilantro and get a small kick from the jalapeno peppers in it, and when combined with the tomato "salsa" on top, which is so fresh and delicious, it's sure to be a hit at any table! The other two hummus offerings that Pita Jungle has include a plain hummus and a roasted red pepper hummus. I have tried both, but as stated previously, I typically choose to order the cilantro jalapeno! Also, keep in mind that if you go to the restaurant while they're having happy hour, you can get a sample of each of the hummus types in a small hummus trio, which is served with a few pieces of pita bread as well!


Next, my favorite pita from Pita Jungle is the Mediterranean Roasted Chicken (Shawarma) pita. This pita has in it, pieces of marinated grilled chicken with onions, mixed greens, tomatoes, pickles, and garlic sauce, and tahini, as seen below. I accidentally made the mistake, when I went this time, of ordering an extra side of tahini, because it's not really needed, but I have to say that I really enjoy this pita every time I choose to get it! The grilled chicken is marinated perfectly and let me tell you: you will savor every. last. bite! This pita is packed with a punch: flavor from the chicken, crunchy-ness from the mixed greens, a little bit of sour-ness from the pickles, a little bite from the onions, and a hint of garlic and tahini to bring it all together. Need I say more?


Lastly, this, below, is the Spicy chicken wrap ... HIGHLY recommended if you enjoy spicy food! It contains marinated chicken, brown rice, tomatoes, onions, zucchini, tomatoes, yellow squash, cauliflower, broccoli, and herbs. I'm definitely partial to the chicken shawarma pita, as previously described, but I have to give credit where credit is deserved and this wrap DEFINITELY deserves credit. The wrap is full of flavor from the marinated chicken, slightly tangy from the tomatoes, and is VERY filling with the rice and vegetables! This is my mom's favorite dish from there, and she pretty much gets it at the restaurant, every time.


As you can see in all of the above pictures, the quantity of food that is served is quite large and we pretty much always have leftovers after we're done eating! The only downside is that Pita Jungle does not offer a special lunch menu, so the quantities are the same, regardless of whether you go for lunch or for dinner. Some of the other dishes that I've tried and enjoyed from this restaurant include: Philly Chicken Pita, Pesto Pizza, Chicken Combination Platter, andddd also, Baklawa ... because, I mean, who could forget dessert?

To take a look at Pita Jungle's complete menu, which includes pictures and descriptions of all their menu items, visit: http://www.pitajungle.com/menu/

Pita Jungle offer Happy Hour specials on Tapas and Drinks, which vary by location, so if you're in the mood for small plates and drinks, take a look at their offerings here: http://www.pitajungle.com/happy-hour/

Additionally, Pita Jungle can cater your next party! To find out more information about that, please visit here: http://www.pitajungle.com/catering/

Have you been to Pita Jungle? What are some of your favorites from there? 

Saturday, April 21, 2012

Mix and Match Baked Pasta Casseroles

If your household is anything like mine, then you know that a lot of the times, the amount of variety in the pantry is pretty ... lacking. My goal on a regular basis is to use all that we have, but try to do something different with it ... Mix and Match!! Well, after this idea came to me, I decided to look for some recipe ideas that would enable me to use some of my favorite ingredients to create a dish! I found an article on foodnetwork.com that had a pretty detailed method with which you can created HUNDREDS of different varieties using some of the same ingredients, by making only a few changes! ... SO, I present to you, Mix & Match Baked Pastas Casseroles!

Here's their step-by-step guide on how to construct your perfect plate!

1. Pick a Pasta

Preheat the oven to 450 degrees F. Bring a large pot of salted water to a boil; cook 1 pound of pasta (choose from these) until very al dente, 2 or 3 minutes less than the label directs; drain.

* Farfalle
* Cavatappi
* Fusilli
* Rigatoni
* Penne
* Ziti
* Large shells

Note: Be sure to undercook the pasta for your casserole; it will soften in the oven.


2. Make the Sauce

Heat 2 tablespoons olive oil in a large skillet over medium heat. Add 4 sliced garlic cloves and a pinch of red pepper flakes; cook until the garlic is golden. Crush a 28-ounce can and a 15-ounce can of plum tomatoes into the skillet with your hands; rinse out each can with 1/2 cup water and add the water to the skillet. Add 4 large basil sprigs; simmer, uncovered, until the sauce is thickened, 15 minutes. Discard the basil; season the sauce with salt. (Alternatively, heat 4 cups prepared tomato sauce.)


3. Choose Your Mix-ins

While the sauce simmers, prepare 3 cups meat and/or vegetables (in any combination).

* Italian sausage, crumbled and cooked
* Meatballs, cooked and quartered
* Pepperoni, chopped
* Rotisserie chicken, shredded
* Hard-boiled eggs, chopped
* Roasted red peppers, sliced
* Frozen artichoke hearts, thawed and chopped
* Zucchini, sliced and sautéed
* Mushrooms, sliced and sautéed
* Eggplant, sliced and sautéed
* Fennel, sliced and sautéed
* Spinach, chopped and sautéed
* Escarole, chopped and sautéed
* Black or green pitted olives, chopped


4. Flavor the Sauce

Stir one of the following ingredients into your sauce, then add your meat and/or vegetable mix-ins.

For herb sauce:
1 cup each chopped basil and parsley

For creamy sauce:
1 cup fresh ricotta

For meat sauce:
3/4 pound pancetta, diced and browned


5. Pick Your Cheese

Prepare 3 cups melting cheese and 1 cup grating cheese.

Melting Cheese
* Fresh mozzarella, cubed
* Mild provolone, shredded
* Italian fontina, shredded
* Young asiago, shredded

Grating Cheese
* Parmesan, grated
* Pecorino, grated
* Ricotta salata, grated


6. Bake the Casserole

Toss the cooked pasta with the sauce and half of each cheese. Spread in an oiled 3-to-4-quart baking dish. Sprinkle the remaining cheese over the pasta. Bake, uncovered, until browned, about 15 minutes. Let rest 15 minutes before serving.


From these ingredients, I'm pretty sure you can come up with your own version with whatever appeals to you, but if you're having a difficult time choosing which ingredients to combine first, I found three recipes you can try out:

1) Baked Cavatappi With Artichokes and Fennel
http://www.foodnetwork.com/recipes/food-network-kitchens/baked-cavatappi-with-artichokes-and-fennel-recipe/index.html


2) Baked Farfalle with Escarole and Zucchini
http://www.foodnetwork.com/recipes/food-network-kitchens/baked-farfalle-with-escarole-and-zucchini-recipe/index.html


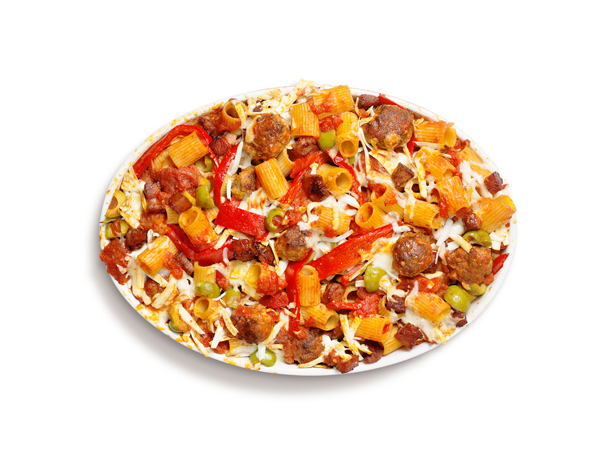
3) Baked Rigatoni with Meatballs and Peppers
http://www.foodnetwork.com/recipes/food-network-kitchens/baked-rigatoni-with-meatballs-and-peppers-recipe/index.html


Let me know what you think of this idea and if you have any other mix-and-match ideas!

Saturday, April 14, 2012

King's Hawaiian Burger Recipes

Hello everyone! I was browsing through a magazine I recently received and one of the first things that caught my eye were a series of burger/sandwich recipes that I knew I had to share, especially with the summer coming up --- PERFECT grilling season!! These, in particular are by a company called King's Hawaiian!

First, a little bit about the company: King's Hawaiian was founded by Robert Taira in the 1950's after he traveled to the islands of Hawaii, specifically, Hilo. There he attended and graduated at the top of his baking school and went on to open a bakery- Robert's bakery, which was the place where he created the famous Original King's Hawaiian Sweet Bread! Following that, his bakery expanded and moved to Honolulu, and eventually, in the late seventies, to California. This bread can now be found in bakeries, restaurants, etc. for all to enjoy!

I chose the three burger/sandwich recipes that were featured in the magazine to share here, and then I'll provide a link at the end so you can check out more favorites on their website!

So let's get started!

1) The Maui Burger


What you will need for the burger: [1 serving]

1 King's Hawaiian Sandwich Bun
1 (8oz) Angus Hamburger
Shichimi Aioli (recipe provided)
Your Favorite Teriyaki Sauce
1 Slice American Cheese
2 oz. Thinly sliced Maui or Vidalia onion
2 Slices tomato
1 Slice pineapple
1 Leaf lettuce
Pickles and Olives to garnish

What you will need for the Shichimi Aioli:

2 tbsp. mayonnaise
1/4 tsp. shichimi togarashi (Japanese red pepper condiment, available in Asian grocery stores)


Directions:

1) Place hamburger patty on grill to desired doneness.
2) Toast King's Hawaiian Sandwich Bun on grill.
3) Toast pineapple slice on grill.
4) To assemble burger, spread shichimi aioli on each slice of roll; between buns, place hamburger, which has been brushed with teriyaki sauce, then add cheese, tomato slices, lettuce pineapple, and onion.
5) Serve with pickles and olives.


2) Lil' Kahuna Sliders


What you will need: [3 servings]

3 King's Original Hawaiian Sweet Dinner Rolls, cut horizontally in half
3 pcs. chicken thigh meat
4 oz. Italian dressing
1 tsp. dried oregano
1 tsp. dried basil
1/2 green bell pepper, cut to the size of the dinner roll
1/2 red bell pepper, cut to the size of the dinner roll
1 oz. red onion, cut to the size of the dinner roll
6 pcs. pineapple chunks
Pineapple top for garnish
Pickle and olives to garnish
3 oz. lilikoi aioli (recipe below)

What you will need for Lilikoi Aioli:

1/4 cup mayonnaise
2 tbsp. lilikoi (passion fruit) preserves

Directions:

1) Combine Italian dressing, oregano and basil, divide.
2) Marinate chicken thighs with half of the dressing mix for several hours and vegetables with the remaining dressing for half an hour.
3) Grill chicken, vegetables, and pineapple chunks.
4) Arrange on a skewer, cherry tomato 1st, top of bread, onion, bell pepper, chicken, bottom of bread, and a cherry tomato on the bottom to hold sandwich in place.
5) Stick into the pineapple top any style you like.


3) Kauai Club Sandwich


What you will need: [8 servings]

8 King's Hawaiian Original Hawaiian Sweet Mini Sub Rolls
1/2 cup mayonnaise
1 tbsp. prepared horseradish sauce
2 tbsp. chili or cocktail sauce
2-4 leaves green leafy lettuce
8 slices hot, cooked bacon
2 medium tomatoes, sliced
1 (12 oz.) deli-sliced chicken or turkey


Directions:

1) Preheat oven to 325°F.
2) Combine first three ingredients until well blended; set aside.
3) Wrap rolls in foil and warm in oven for about 10 minutes.
4) Spread 1/2 of mayonnaise sauce evenly over bottom roll, cover with lettuce leaves allowing edges to slightly extend beyond bread.
5) Place bacon strips on top.
6) Top with tomato slices, then sliced meat to cover entire surface.
7) Spread remaining sauce on top roll.
8) Secure with toothpicks or short skewers.

I haven't had a chance to try any of them out yet, but I'm definitely planning on it! Don't they look ridiculously delicious?

And as promised, for more recipes including those for breakfast, lunch, appetizers, dinner, and dessert, you can check out this website: http://www.kingshawaiian.com/recipes/. Let me know which ones you try out!

The pictures in this blog post were taken from the King's Hawaiian website.

Monday, April 9, 2012

California Pizza Kitchen

It was a ridiculously busy weekend BUT I had a chance to go out to eat with my mom and we chose to go to California Pizza Kitchen (CPK)! I took some pictures of what we had to eat, so I thought I'd do an official post! ... It had been a while since we had been to this restaurant, but it is definitely one of my favorites due to their variety of food. If you haven't been there before, let me start off by telling you a little bit about the restaurant from the information I read on their website:

CPK was first opened in 1985 in Beverly Hills, California by Rick Rosenfield and Larry Flax, who had a passion for food and the desire to combine creative ideas to create some of the more innovative pizzas there are! Since their opening, they have expanded from California and now have locations all over the WORLD, totaling more than 250! In the US, they are located in more than 30 different states and also are located in a total of 11 countries. As you have probably noticed, CPK also has other various locations such as in major airports, sports stadiums, and college campuses, and have frozen pizza that you can purchase at your own grocery store! Their restaurant menu includes pizzas, pastas, salads, sandwiches, and much more, so you're definitely in for a treat.

While we were there, I asked our waitress what the most popular dishes were and she told us that both the BBQ Chicken pizza and the BBQ Chicken salads are favorites. Well, I have tried and enjoyed both in the past, so we decided to try all new dishes this time (except one), and let me tell you: I am VERY glad that we did!

So the first couple of dishes we ordered were from their newer small cravings menu. First up was the Mediterranean plate! This is what CPK describes is included in the plate: "Tuscan white bean hummus, Feta topped with extra virgin olive oil and a small Greek salad. Served with traditional pizza pita bread." --- In general, I am VERY picky when it comes to hummus and it has to be, "just right" for me to enjoy it. This one, I must say, definitely was! The small Greek salad contained cucumbers, olives, onions, some spices, and I'm assuming some lemon juice, among other things, because it definitely had a slightly tangy kick to it! Definitely wished that there was more of that on the plate! ... I don't know if it's the correct way to eat this, but I created a mini taco with everything that was on the plate: took a piece of pita bread, spread some hummus on it, put some of the Greek salad on top as well as some Feta cheese, and voila! Delicious! I would definitely definitely recommend this plate.


Along with the Mediterranean plate, we got the Spicy Chicken Tinga Quesadilla! The official description of the plate: "Hearth-baked with lime chicken, Queso Quesadilla, and Enchilado cheese, chipotle sauce, caramelized onions, roasted bell peppers, black beans, and cilantro. Served with ranchito sauce." --- Honest opinion about the plate: probably could have done without it. The enchilada itself wasn't very tasty and had sort of a bitter taste to it ... what I'm guessing was from the chipotle sauce. The only enjoyable thing on the plate was the sauce so I guess ... overall rating of the dish: just okay. Would not recommend considering there are so many other dishes to choose from!


Next: a pizza! It's California Pizza Kitchen so of course we had to try at least one! This time, we tried the Roasted Artichoke + Spinach pizza with chicken. The pizza contains, "artichoke hearts, sauteed garlic spinach, Fontina, Mozzarella, and Parmesan with spinach artichoke sauce." --- I was a fan of this one and I think you will be too, especially if you don't eat very spicy foods. This pizza is flavorful with the artichoke hearts and spinach, along with the chicken but it definitely doesn't have ANY spicy-ness, so no kind of extra punch from anything like maybe a couple of their other pizza's do. If you get this pizza, I recommend adding some crushed red pepper that they keep at the table, and you'll be good to go if you eat spicy food! I would order this one again.


Next up- my most favorite dish of the evening AND one of my most favorite dishes from the whole menu: Kung Pao Spaghetti with Shrimp. This spaghetti has a "classic Kung Pao sauce with garlic, green onions, peanuts, and hot red chilies." And the proteins of choice include chicken, shrimp, or both chicken and shrimp. CAUTION if you order this: depending on the chilies, it can get REALLY spicy. This particular evening, it was more spicy than I had EVER had it before ... almost too spicy ... but I powered through it because it was absolutely DELICIOUS. It was a good thing we had that not-so-spicy pizza at the table to take away from the heat but I pretty much end up getting this dish every time. You must try it!!


And so, after that spicy pasta plate, my mom and I decided we had to have some dessert too! :) It's the best part of the meal anyways, right? I chose a Hot Fudge Brownie Sundae! ... Fairly self-explanatory as to what that is: a brownie with ice-cream, pecans, whipped cream, and a cherry on top as seen below! I NEVER complain about dessert and this is no exception! LOVED every bite!


In addition to this, a couple of my other favorite dishes at this restaurant include: the BBQ chicken pizza and BBQ chicken salad as I previously mentioned, the Chicken Tequila Fettuccine (tied with the spaghetti for my favorite dish from their "Pastas" portion of the menu), the California Club Sandwich (no bacon), and their chocolate souffle as well as butter cake! YUM.

Andddd one more: If you haven't tried their Raspberry Lemonade, it's a must. I'll get this with my meal pretty much every time!


If you're craving some CPK after this, the closest location to you can be found here: http://www.cpk.com/locations/

Here's a look at their menu with a very convenient "Online Ordering" option: http://www.cpk.com/menu/

If you want to try out some dishes yourself from CPK, here's a link to purchase Cookbooks: http://www.cpk.com/company/cpk-cookbooks/

And lastly, if you're planning on visting CPK soon, make sure to join their e-club! When you do, you receive a $5 off coupon via e-mail that you can print off. Here's the link to join: http://assets.fbmta.com/clt/cpk/lp/join/join.asp

All opinions featured in this blog post are my own. I hope you enjoyed this and let me know what some of your favorite dishes from this restaurant are!!

Friday, April 6, 2012

Seven Layer Dip

By far, one of my most favorite kinds of food is Mexican food. Tacos, burritos, enchiladas ... I'm fairly obsessed with it all! AND one of my favorite items to make when I'm in the mood for Mexican food, but not hungry enough for tacos/burritos, is Mexican 7 layer dip, including guacamole and all! So primarily, the recipe for how to make this is as follows:

What you will need to assemble the dip:

Pan for assembly
1 can refried beans
Salsa
Cheese
Sour cream
Tomatoes
Jalapenos
Olives
Other toppings as desired

What you will need for the guacamole:

1 Mashed Avocado
1 Chopped Tomato
1/4 Chopped Onion
Chopped Cilantro
Lime Juice
Salt

Directions:

Primarily, make the guacamole. In a bowl, combine avocado, tomato, onion, and cilantro. Mix together and add lime juice and salt to taste. Set aside.

Then, grab your pan and start layering the dip! For the first layer, heat up the refried beans and spread them on the bottom of the pan.


Next take the guacamole you prepared, and make it the second layer!


On top of that, add the salsa for your third layer.


For the next layer, add sour cream and spread. Then, on top add toppings of choice! My choices were: tomatoes, jalepenos, and olives!


And for your final layer, add the cheese.


Serve with tortilla chips and enjoy!

This is definitely one of my most favorite things to make because it's so quick and easy. I love love making guacamole and eating it with chips too but with this, it's even better! Quite frequently, I take this with me when I go to potluck parties because it seems to be a big hit! ... Do you have your own version of a 7 layer dip? Let me know! :)